The Essential Ricoh GR iii / GR iii x Owner’s Guide
As a seasoned Ricoh GR III owner I’ve learned a lot of lessons along the way about these expensive little pocket cameras. Some lessons I’ve learned the hard and costly way.
With any luck this Ricoh GR III/GR IIIx Owner’s Guide will save you time, money, and help you get the most from your camera.
The fundamentals
Ricoh GR cameras have a loyal following amongst street photographers worldwide, especially having been adopted as the go-to cameras of prolific YouTube street photographers Samuel Lintaro Hopf and Sean Tucker. There’s no surprising these cameras have gained a loyal, if not cult, following.
Given the arch-nemesis of all street photographers is the dusty coat pocket, it comes as no surprise the #1 problem with the Ricoh GR iii / GR iii x is dust. The previous GR versions were worse, but even with a dust reduction system these cameras can fall victim to dust within days (yes, I learned that the hard way).
Later in this guide I’ll cover the best way to protect the Ricoh GR iii from dust. It’s not without compromise, but it’s by far the best protective option for longevity with your camera.
There are a number of other gremlins with the Ricoh GR iii cameras. The wheel on the back of the camera tends to break over time, making control of the camera somewhat erratic. Don’t worry, we’ll cover that too.
We’ll also cover maintenance, firmware updates, batteries, and a few essential gadgets to help maintain your Ricoh GR iii / iii x.
If you find any of this guide useful, please share it with other Ricoh GR iii owners so it can help them too.
How to protect the Ricoh GR iii against dust
Prevention is better than cure – trust me on this. Once the dust is on the sensor you have some options which we’ll discuss later, but they’re painfully unreliable or lead to many months without a camera.
So what is the Ricoh GR iii dust problem?
In short, when you turn on the camera the lens will pop out causing static electricity to build up. This is an open invitation to nearby dust particles to attach themselves to the lens housing. When you turn the camera off, that dust gets sucked right into the body and onto the sensor.
When you pay so much money on a pocket camera the last thing you want is dust on the sensor and your photos looking like an inverted starry night.
So without too much ado, these are my best tips to protect the Ricoh GR iii against dust:
- Invest in an official Ricoh Imaging Lens Adapter GA-1 and combine it with a decent 49mm filter. This is 100% the most effective dust prevention method on the Ricoh GR iii cameras. The obvious caveat is you’ll need a slightly larger pocket, but it’s a small price to pay and well worth the trade off. If you want a cheaper option, the Haoge LAR-GR Lens Adapter is just as good and about half the price. It’s not quite as polished as the official Ricoh GR iii lens adapter, but it’s still good.
- If you really can’t cope with extra bulk on your Ricoh GR iii then at the very least invest in a lens cover cap (also by Haoge). It doesn’t need to be anything fancy, but you’ll need to get in the habit of taking it on and off. If you’re ageing and a little scatty like me you may find those perfect street photo moments are wasted if you forget to take the cap off.
- If neither 1 nor 2 suit you, then at the very least keep your pockets free of dust.
How to remove dust from the sensor of a Ricoh GR iii / GR iii x
If you’ve failed to protect your Ricoh GR iii against dust, then you’ll likely find yourself in a situation where you have one or more ugly black spots on your photos. Post-removal of those spots in Lightroom will be a tedious chore, so what else can you do?
Sending your Ricoh GR iii back to Ricoh
This is the safest option, but it will also cost you money and lead to many weeks without your camera.
The costs to repair a Ricoh GR iii from Ricoh Germany are as follows (at the time of writing):
- Repair cost: 80 Euros minimum + 20% tax for cleaning the sensor and any further work.
- Return Shipping: 20 Euros for Ricoh to send the camera back to you.
- Shipping: Whatever it costs to send your Ricoh GR iii to Germany.
Unfortunately the 80 Euros minimum cost may escalate if Ricoh find any other aspect of your camera which needs repairing.
Using a vacuum cleaner to remove dust from your Ricoh GR iii
Yes, you read that right – a vacuum cleaner *may* remove or dislodge dust from the sensor of your Ricoh GR iii. It’s a method which can be used on any pocket camera with a small chance of success. On the upside, it’s free.
Use a crevice tool on the vacuum, or at the very least remove any head with bristles. Start with the power on low by opening any suction vents, and increase suction as much as you feel comfortable until you find success.
Place the Ricoh GR iii on a table with the lens housing facing upwards. Start with the camera in an off position and the lens retracted, and gently circle the vacuum around the edge of the lens housing. Once this is done, power the camera on and repeat the process with the lens protracted.
The following video serves to explain the process on a Sony RX100 (same principal):
Using a beard trimmer to dislodge dust from a Ricoh GR iii sensor
Sounds crazy, but in some cases using a vibrating object like a beard trimmer / hair clipper / electric toothbrush / your wife’s rampant rabbit may serve to dislodge dust from the sensor of your Ricoh GR iii.
Take care and initially move the vibrating object gently over the rear of the camera. Use a dust cloth or some kitchen roll to protect the camera from being marked (especially by the blades of a beard trimmer).
Here’s a visual:
Fixing the Ricoh GR iii Wheel Problem
This happened to my Ricoh GR iii and it became a pig of a job adjusting ISO with the scroll wheel. It got so bad I couldn’t even delete a bad photo without a risk of deleting all, and the screen flickered around like a fruit machine.
Obviously the best way to fix the Ricoh GR scroll wheel problem is to return it to Ricoh, especially if it’s still under warranty, but I mentioned earlier how longwinded and potentially costly this is (if out of warranty).
Don’t try this at home, and if you do don’t blame me if it goes wrong. I was at the point of throwing the camera in a bush in frustration prior to doing this, but thankfully it turned out well.
So here goes – how to fix the Ricoh GR scroll wheel problem:
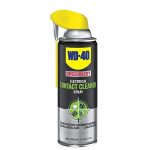
- Buy some WD-40 Specialist Contact Cleaner. This is by far the best option, but a little alcohol may also work. I confess to using regular WD-40 successfully, but the contact cleaner is much less risk to your expensive camera.
- Take out the battery and SD card and press the power button to ensure all residual electricity is used up in capacitors.
- Spray a tiny bit of contact cleaner on the left side and right side of the wheel. I sprayed the oil into a teaspoon then dabbed it on the wheel which may be the safer option.
- Rotate the wheel (with gusto) clockwise and then anti-clockwise until you’re satisfied the oil has worked it’s way across the contacts behind the wheel. This should serve to disperse any dust and gunk wreaking havoc on the contacts (but keep in mind that gunk is going to go elsewhere in the camera, hopefully somewhere where it can live in peace).
- Do not use the camera in at least 24 hours, perhaps 48 hours to ensure it’s fully dried out. Put the battery and SD card back in, and away you go.
Fingers crossed the above works. If you clean your Ricoh GR scroll wheel with contact cleaner in this way please let me know if you have success or failure. My wheel is still a little glitchy so I may repeat the process, but at least my GR is useable once again.
If the scroll wheel on your Ricoh GR iii has gone haywire, this is what to do:

